Showing posts with label entertaining. Show all posts

Sunday, August 14, 2011

Clambake!

(Or, as titled by Nathanael "Clambake, Clambake, oh what fun!")

dinner
Meet our dinner last night.

And a few of his friends:
red v. blue

kirk and the lobsters

Yesterday was my husband's birthday. Most women take their husbands out to dinner for their birthdays, or maybe stop by a bakery and buy them a nice cake. I, on the other hand, decided it would be fun to have a clambake for my husband's birthday. I mean, what could be more fun than bringing a little bit of beach to my closet-sized kitchen and tiny backyard in the middle of the city?

Not to be deterred by the fact that I had no sand, and couldn't dig a hole in my brick patio backyard, I found an alternate clambake method here. This goes to show that 1) you can find anything on the internet, and 2) there are people just as crazy as me out there!

Here is the pictoral version of our clambake, as documented by Nathanael. (Taken in my windowless kitchen, so they are a little dark!)

First, find some lobsters, and some friends. Thanks, Kirk, for helping with my mad scheme!

Next, give your lobsters some beer. You want them to die a happy death, after all:
lobster and beerdrunken lobster

Grab some fellow sea-creatures:
musselsclams

And some vegetables and seasonings:
potatoeslemons

Until your counter is full of ocean-y goodness:
drunken lobster 2

Next, soak some cloths in cheap beer:
soaking cloths

Lay a cloth out on the counter and put a lobster and handful of mussels and clams in the center:
lobster and mussels

Pile on ears of corn, red potatoes, a lemon, some quartered onion, smashed garlic, and some rosemary & thyme:
ingredients 2

Add some italian sausage to the top, and tie up the bundle. Place your bundle on a large sheet of foil and wrap the bundle in seaweed:
adding seaweed

Wrap your bundle securely in foil, and you are ready to grill!
on the grill

While your clambake is cooking, enjoy a little beach ambiance:
DSC_0144DSC_0146_2

After about an hour, check to see if everything is cooked:
off the grill

Spread out on your picnic table:
the spread

Enjoy!
the aftermath

We pretty much followed the Washington Post recipe for this clambake. The proportions on that recipe are for giants, however; I used 6 1-lb lobsters, 4 lbs of mussels, 2 dozen clams, 10 ears of corn, 10 sausages, and 16 potatoes. We made 6 packets (plus a 7th with extra with veggies and mussels), and it was plenty to feed 12 people. We used the "steam in packets" method, but put the seaweed between the foil and the flour-sack cloth. This kept everything really moist and had a good flavor, plus was easy clean up! I was unable to find fresh seaweed, so I ended up using dried seaweed from the Chinese market. I soaked it overnight then drained it. We used about 3/4 a bag of charcoal, and let the grill heat for about half an hour before we started. We could get four packets on our grill at a time, so we did them in two shifts. Each packet cooked in about an hour (so the charcoal lasted just barely long enough to finish the second set--it may have helped to add a few more hot coals when we put on the second set). We grilled the sausages at the end (to get them crispy), and grilled a few of the mussels that hadn't quite opened yet. I also didn't prepare the lobster before serving it, like the article said. This is a clambake, people! You spread it out on the table and let everyone dig in! (Also, half the fun is watching your guests figure out how to crack open a lobster ;)). I served everything with drawn butter and chile-thyme spiced butter.

Wednesday, June 1, 2011

Sour Cream-Pecan Coffee Cake

Hello, June! The 100 degree weather outside is a sad reminder that Spring is already over. May flew by so quickly, that I had little time to document my culinary adventures. But here's a quick photo tour:

My first attempt at cake-pops for a co-worker's farewell party:
cake pops
Vanilla cake with dark chocolate and sprinkles. I also made red velvet cake with white chocolate. Tutorial here. The balls are on wooden skewers that I stuck into blocks of styrofoam (recycling!), and surrounded with greenery from my front yard.

End of the World Taco Party!
(judgment) Taco day preparations
I may have made a little much food for this party ... that'll have to be a separate post.


And lots of brunches:
Brunch: I'll be eating that, thanks.Brunch: I didn't know you could do that to eggs.
DSC_0128
Lemon Rolls, Baked Eggs with Spinach and Mushrooms, Sour Cream-Pecan Coffee Cake

The coffee cake comes from a book titled Breakfast and Nine, Tea at Four. Naturally, I bought the book just based off of the title. Actually, I convinced my Dad to buy book for me by promising to make this coffee cake -- the first recipe I saw when I opened the book. I highly recommend making it for your Dad for Fathers Day!

Sour Cream-Pecan Coffee Cake

Ingredients
1/2 cup finely chopped pecans
1 1/2 cups granulated sugar, divided
1 1/2 teaspoons ground cinnamon
3/4 cup softened butter, plus 2 tablespoons diced butter
1/2 cup brown sugar
3 eggs
2 cups all-purpose flour
1 cup whole wheat flour
1 tablespoon baking powder
3/4 teaspoon baking soda
1/2 teaspoon salt
1 1/2 cups sour cream
1 teaspoon vanilla

Instructions
1. Preheat oven to 350 degrees. Grease and flour a 10-inch bundt pan.
2. Combine chopped pecans, 1/2 cup of granulated sugar, and cinnamon. Spoon two tablespoons of this mixture into the greased bundt pan.
3. Beat the butter with an electric mixer on medium speed until cream. Add remaining sugar and brown sugar slowly, mixing until thoroughly combined. Add eggs one at a time, mixing after each addition.
4. In a separate bowl, combine the flours, baking powder, baking soda, and salt.
5. Add the flour mixture to the butter mixture alternately with the sour cream, beginning and ending with the flour mixture. Beat on medium low until thoroughly combined, but be careful not to over-mix. Gently stir in the vanilla.
6. Spoon half the batter into the prepared pan. It'll be very thick and heavy, so it is helpful to drop it by large spoon fulls into the bottom of the pan. You can use a slightly wet spatula to flatten the drops down and push them together. Sprinkle half of the remaining pecan/sugar mixture over the first layer of batter. Repeat with the remaining batter and pecan mixture. Top with diced butter.
7. Bake for 40-50 minutes, until a knife inserted into the center comes out clean (be careful not to stick it into the middle pecan layer, which will be sticky). Cool on a wire rack for 10 minutes. Gently loosen the cake from the sides of the pan and turn out onto a plate. It's easy to lose the top layer of batter in this step, so make sure your cake is pretty loose before you turn it out. But you can always stick it back together, or drizzle a glaze over the top if it falls apart!

Serve warm or at room temperature. 

Friday, September 17, 2010

A recipe for a perfect Friday night


Step 1: Find a park with a free concert. Like Jazz in the Garden.

Step 2: Spread a blanket on the ground and eat delicious appetizers picnic-style while listening to the concert.

Step 3: Return home and grill Marinated Vegetables and chicken for Lemon Oregano Chicken Pasta.

Step 4: Eat dinner at dusk on your back patio with plenty of candles and a bottle of wine.


Crostini with Whipped Feta, Marinated Red Peppers, and Olive Tapenade
adapted from Cooks Illustrated (Sept/Oct 2010, pg 20)


Saturday, September 11, 2010

Grilled Pizza Margherita


September is finally here! Which means two things: It's finally not 100 degrees out every day, and the farmer's markets are full of gorgeous heirloom tomatoes.

Although we do live in a tiny apartment with a tiny kitchen, we also happen to live in the basement of a rowhouse with a beautiful back patio.  And with a little TLC and a lot of weeding, it is now the perfect place for late summer grilling parties. So last weekend we decided to christen our patio by grilling pizza.

Now for some reason, I have bad luck with pizza. I mean, my pizza always tastes good, but it usually sticks to something, or crumples when I try to get it onto the pizza stone, or loses toppings on the bottom of the oven, or sets off the fire alarm. Or all of the above.  So you can imagine my husband's skepticism when I suggest we try pizza on the grill

But it actually turned out to be so easy, and fun, that his comments turned from a begrudging "ok, I'll help you grill pizza" to "look at the pizza I grilled!" But hey, if we get to eat something this good, I'll take that any day ;). 


Our favorite pizza is the classic Pizza Margherita, so we decided to try it with the cherokee purple heirloom tomatoes, fresh mozzarella, and basil leaves from my garden. It was amazing:


Thursday, June 17, 2010

Black Tie Mousse Cake

This, quite simply, is chocolate decadence. Olive Garden charges $7 a slice for this. I made the whole cake for about $5. The recipe is not a simple one, but nearly all the reviews I've read from people who have made it concur--it's worth the time.


It begins with a few of my favorite things:


You can make the first two layers the night before, like I did.

Layer one is a chocolate cake. That part actually went together so quickly I forgot to take a picture. You could even use a cake mix, although you would have a lot of leftover batter.

Layer two is a chocolate cheesecake. If you have a favorite recipe for chocolate cheesecake, feel free to use that.


Layer three is an Italian mousse. I used a recipe that involved a mixture of cream cheese and heavy whipping cream, but I've also found recipes that are for a more custard like mousse. I'd like to try it that way next time.


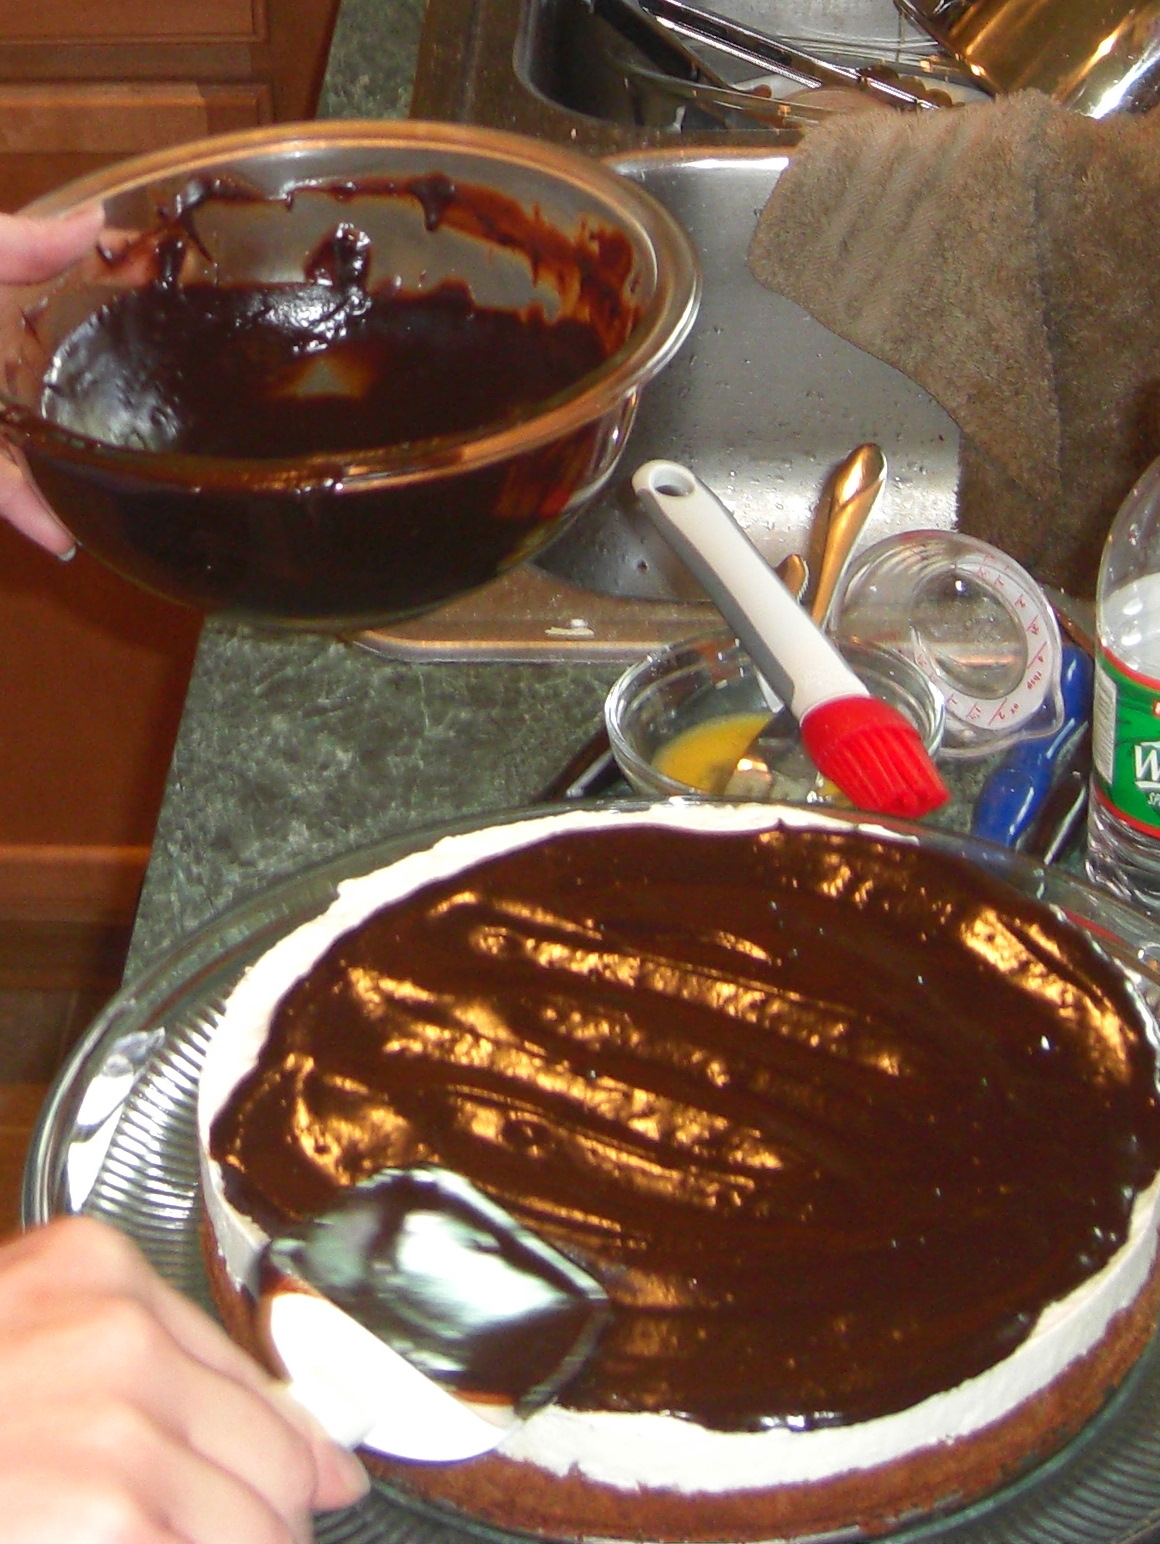
Layer four is a dark chocolate ganache. All I have to say about that is: chocolate and cream were made for each other.

Drizzle a little white chocolate in three circles around the cake and swirl with a toothpick before the ganache sets up.


For the grand finale, take some mini chocolate chips and press them along the edges to create a crust.


Oh, wait, we're not done yet... there's not quite enough chocolate here yet. Let's make a little chocolate whip cream to decorate the edges.


And there you have it. Chocolate. Decadence.


A little Hershey's syrup for presentation if you can handle just one more kind of chocolate:


Olive Garden copycat recipe for


Black Tie Mousse Cake


Layer 1 Chocolate cake "crust":

3 Tablespoons butter, softened
2/3 Cup sugar
2 eggs
1/2 Teaspoon vanilla
1/4 Cup baking cocoa
1/4 Cup flour

Preheat oven to 350. Lightly grease bottom only of a 9 inch springform pan. In medium bowl cream butter and sugar. Add eggs, beating well after each addition; add vanilla and mix well. Add flour and cocoa and mix well to combine. Batter will be stiff. Spread in pan. Set aside.

Layer 2 Baked Chocolate cheesecake:

8 Ounces cream cheese, softened
1/2 Cup ricotta cheese
3/4 Cup sugar
1 Ounce unsweetened chocolate, melted and cooled
2 eggs
1 Tablespoon flour

In large bowl cream cheeses with sugar until smooth. Add small amount to melted chocolate and combine well, add chocolate mixture and beat until well combined. Add eggs and flour and beat well. Smooth over top of cake batter in pan. Bake at 350 for 25-30 minutes or until cheesecake is set in center. Cover with foil during last 10 minutes if needed to prevent over browning. Remove from oven and cool.

Layer 3 Italian mousse:

3/4 c. heavy whipping cream
12 oz marscapone or cream cheese, softened (or 6 oz of each)
1/4 c. sugar
1/2 tsp. vanilla
1 T. cold water
1 T. boiling water
1 tsp. unflavored gelatin

Beat cream until stiff. In separate bowl beat cream cheese with sugar and vanilla until smooth. Combine with cream and fold to combine. In small bowl soften gelatin in cold water for about 1 minute. Pour boiling water over gelatin and stir to dissolve gelatin. Cool five minutes. Fold into cheese mixture until just combined. Spread mixture over baked cheesecake layer and chill well (freezing the cake at this point works well and makes spreading the final layer easier).

Layer 4 Dark chocolate/white chocolate ganache:

9 oz dark chocolate, either chips or bars broken in pieces
3/4 cup heavy whipping cream
1 Tablespoon butter
3 Tablespoons white chocolate chips
1 cup mini chocolate chips

Heat cream and butter over low heat until just boiling (may also microwave). Place dark chocolate chips/pieces in large bowl. Reserve 1 1/2 tablespoons cream mixture. Pour cream mixture over dark chips and let set about 2 minutes, or until chips begin to melt. Stir to combine. Repeat for white chips using reserved cream mixture. Let ganache cool until spreading consistency (set in refrigerator to speed this part up).

Using a sharp knife gently run blade around edge of cake to loosen. Remove cake sides from pan and place bottom with cake on serving plate or stand. Spread frosting over top and sides. Drizzle white chocolate lightly over top. Using a knife or toothpick run it lightly over top to swirl to create desired effect. Press mini chips into frosting on sides until completely coated to create a "crust".

Mousse frosting:

1/2 heavy whipping cream
1/4 c. powdered sugar
1/8 c. baking cocoa
1/8 tsp. vanilla

Combine all ingredients and whip until peaks form. Pipe generously around cake top edge, and center. Chill well and serve. Serves 12-16.

Tuesday, June 1, 2010

Sisters come to visit... and there was much cooking.


Notice anything different about this picture? 

No? Look a little harder, under the plate. 

See the gorgeous stained wood this plate is sitting on? That's my beautiful new table! A real table! No more plastic! No more folding Ikea table! 

Oh, you want to talk about what is sitting on the plate? I guess, if you really think that is more exciting than my new table...


You see, a few weeks ago--the same week we got our new table, btw--The Sisters came to visit. So of course, we had to christen the new table. So we ate a. lot. of. food.

Highlighted foods were strawberries & mangos, New England seafood, and gluten-free, dairy-free, egg-free experiments. (The fruit and seafood were a success... the jury is still out the gluten-free, dairy-free, egg-free part. Perhaps Wendy can post more on that later this summer.) Saturday night's dinner featured Tapas-style mussels, shrimp and haddock, a garden salad with cilantro green goddess dressing, lemony quinoa, and strawberry mango shortcake.

You think that was enough cooking for one weekend? Never! We saved the best for last:


Saturday, May 8, 2010

Buttermilk Pancakes


Yes, that picture was taken from an iphone. No, this post is not from Nathanael.

I wasn't intending to post this recipe, as it was just an experiment. But it was so good, I just had to share it. Hence, only one picture, taken when there was hardly any food left on my plate ;). Next time I make it (which may be tomorrow) I'll take more pictures!

This morning, when I sleepily wandered out into the kitchen to make my morning coffee, I decided I should cut up the mango and strawberries in my fridge into a nice fruit salad. Then I decided they would taste delicious on Alton Brown's buttermilk waffles. Problem #1: I don't own a waffle maker.

But sometimes, even pre-coffee on Saturday mornings, I have brilliant ideas. Waffle batter and pancake batter are basically the same, right? So I pulled out Alton's recipe. Problem #2: If I wanted to make the pasta extravaganza I had planned for tonight, I only had one egg to contribute to this morning's breakfast.  Problem #3: I also only had 6 ounces of buttermilk. 

But pancake batter is supposed to be thicker than waffle batter, right? So I mixed up all the ingredients I had, cooked them in my skillet, and topped them with my strawberries and mangoes. So. So. Good.

Tuesday, March 30, 2010

Bruschetta Chicken Pasta

Due to a very busy month of March, and a bunch of pictures on my camera being accidentally erased, I have had a dearth of pasta-sauce posts. But, due to a lazy weekend in which I had time to enjoy breakfast in bed, put together a 500 piece puzzle, and bake yummy chocolate awesomeness, I finally had the chance to make another Saturday night pasta dinner! (Also, I washed a lot of dishes, thanks to our 1880's house with no dishwasher... pictures of that later, maybe.)


Bruschetta is really a summertime food, but thanks to a little olive oil, balsamic vinegar, and parmesan cheese, it tastes pretty awesome in the winter too. 

My Dad started making this pasta when I was a teenager, probably as a result of something similar he had in a restaurant somewhere. It's always been one of my favorites and has made frequent appearances at birthday dinners. This pasta looks impressive, but is really very easy to make. Plus, all of the prep can be done ahead of time, leaving only the assembly for the last minute.