Sunday, January 31, 2010

Krispy Kale


Today's post comes from my friend and faithful blog reader, Natalie Glaser. As much as I enjoy vegetables, I must admit I was a bit skeptical about this recipe. I was even more skeptical after the first time I made it, and it turned out a slimy, chewy glob of green leaves. Even my husband wouldn't eat it.

But Natalie had raved about this recipe so much, I thought I should probably give it another try. Plus, I still had half a bunch of kale in my fridge! Not one to waste food, I looked around online for a better method of making this dish.

Natalie's method called for sautéing the kale in a very hot skillet (or "flash frying" it, as she calls it--which is a pretty cool name, I think!). I deduced that I did two things wrong the first time I made it: I used too much oil, and I didn't cook it long enough. The first problem I solved by tossing the oil with the kale first--this way I could use whatever amount of oil I wanted, but since it was evenly distributed, the kale would cook evenly. Secondly, I tried using the oven instead of a skillet, which again, caused the kale to cook more evenly.

The oven method worked much better for me. After 10 minutes at 400 degrees, the the kale was bright green, with lightly browned edges. The kale shattered when you bit into it--a vast improvement from the "stewed" version I came up with last time. When you cook kale this way, it has none of the bitter taste you usually associate with kale, and easily takes on the flavor of whatever aromatics you flavor it with (salt, garlic, lemon juice, etc.). And there you have it: a tasty side dish for about 15 cents per serving!

Thursday, January 28, 2010

Oven-Roasted Vegetables


Weird fact about me: I love vegetables. Not just like, enjoy frequently, or appreciate--I LOVE vegetables. When I was six years old, I told my parents that my favorite food was carrots. (Lest you think I was just being a precocious child--they believed me, too ;)). When my sisters and I were learning to cook dinner for our family, they sometimes made a meal without a vegetable. Never me though--I usually picked the vegetable first, and planned the rest of the meal around it. Still today, I am probably the only member of my family who will stick to her grocery list in every part of the store, except the produce section.

Last week at the grocery was one of those weeks. I started out my grocery shopping excursion in the produce department (always a bad idea!), and came home with enough veggies for about three weeks. So this week I have been exploring new vegetable side dish recipes.

My original recipe called for "haricot verts," asparagus,
and fingerling potatoes--none of which I had, of course. I liked the concept, though, so I decided to try green beans, red potatoes, and fennel:


As you can see from the seven ingredients above, this was a very simple dish. But its flavor and elegant presentation makes it a great option for fancy and every-day dinners alike.

Tuesday, January 26, 2010

Vertical Cuisine

If you have gone out to eat much lately, you will have noticed that stacking is in. So last Saturday night I decided to give it a try with some new favorites. If you substitute a less expensive fish, this dish can be beautiful and economical. Green beans can be used in place of the asparagus.

First layer, risotto. I have only tried this a couple of times, but I think I have a basic method that you can add your own twists to (sauteing other vegetables in the beginning, adding small pieces of blanched or slightly pre-cooked vegetables with the wine, or stirring in fully cooked items at the end). Now since the kids have moved out, I make smaller amounts of things. This will make plenty, with leftovers, for two. If your crew is larger just double it.


Layer One - Risotto with Mushrooms

2 T. olive oil/butter
1/4 C. diced onions
1 C. arborio rice
3 C chicken or beef broth (needs to be hot)
1/3 C white wine (optional, but does give a nice acidic flavor; you could try a bit of lime juice)
1/3 C parmesan or asiago cheese
Variation in picture: 1/4 C sauteed mushrooms)

Saute the onions in your oil. Lately, I have been sauteing things in a half and half mixture of olive oil and butter to take advantage of the advantages of both. Add rice and brown for a few minutes. Add about half of your hot broth and cover and simmer for 10-15 minutes, stirring occasionally (every four to five minutes). Add the wine next. After the wine is absorbed (3-4 minutes), add the remaining broth, 1/2 C at a time, until the rice is done. (When you pull back the rice and little or no liquid shows on the bottom of the pan, it is time to add more liquid.) You will probably not use all your broth. When making risotto, you are trying to bring out the starch, so you do all the things you are normally not supposed to do when making regular rice, like stirring often and adding hot liquid. When the rice is done, stir in your cheese and serve. I had precooked my mushrooms and just stirred them in when the rice was done also.

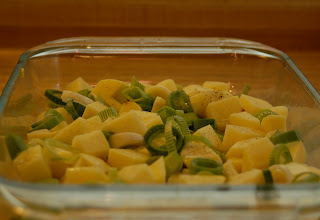
Layer Two - Vegetables

I was planning to steam the vegetables but instead I just boiled them in water for about 10 minutes. Since I was serving this stacked, I decided not to do anything else to the vegetables.

Layer Three - Oven Baked Halibut

I used a concept I had gotten from my daughter. I used frozen halibut that had been flash frozen in individual portions and vacuum sealed. The next best thing to fresh, which is hard to get even in the Pacific Northwest at this time of year. Basically, I dipped the thawed fish in 3 coatings and baked in a 350 degree oven for 15 minutes. You can use any white fish and adjust cooking times as needed.

First, pat the fish dry with a towel, salt and pepper, and dip in flour.

Second, dip in an egg wash of 2 eggs beaten, 3 T. mayonnaise, 2 t. horseradish, 1/2 t. paprika, 1/4 t. cayenne pepper, and 1/4 t. black pepper. (I didn't have horseradish, but I did have a horseradish sauce. I used a tablespoon of that and 2 tablespoons of mayonnaise.)

Third, dip in seasoned bread crumbs. Place fish on a cooling rack placed on a rimmed baking sheet. This allows the air to circulate all the way around the fish, and yields a crisper coating on your fish. Bake at 350 degrees for 15-20 minutes, until the fish flakes easily with a fork.

You can make a quick tartar sauce by mixing mayonnaise and relish to taste. I had some zucchini relish that I had canned last summer. I'll share that recipe later. You could also add different seasonings to the egg wash or with the bread crumbs to your own tastes. Serve by candlelight for a lovely Valentine's dinner.

Sunday, January 24, 2010

Roasted Potato Leek Soup


After several days of blustery, snowy weather, I was ready for some warmth. This happens frequently in the cold land where I live; after an hour of shoveling the driveway, some nice warm soup really hits the spot.

So I began flipping through one of my new Christmas presents, looking for something to do the trick. For some reason, my attention was drawn to a recipe for "Potato-Leek Soup." I'm not entirely sure why--I had never actually eaten a leek before, and my only association with the food was from reading about poor nineteenth-century Irish immigrants who subsisted solely on potatoes and leeks, because they couldn't afford anything else (I read way too much historical fiction as a child....).

But, after a little research, I discovered that leeks are closely related to onions--a food I love, especially when roasted. So I chopped up a few yukon potatoes and leeks, sprinkled them with olive oil, salt, and pepper, and popped them in the oven.


I could hardly refrain from eating them right out of the pan, but dutifully followed the recipe and added a few handfuls of arugula to the mix. One of Ina Garten's favorite methods for developing a recipe is taking a traditional dish and "amping up" the flavor. This recipe definitely did that for potato leek soup, and I'm pretty sure most of that flavor was created by these delicious roasted vegetables.

Of course, I'm notoriously bad at following recipes exactly, so I deviated a little from the original recipe. I did make my own chicken stock (I had chicken bones from dinner the night before--another delightful Ina recipe I'll post sometime--so it was convenient), but I used half the amounts of creme fraiche and heavy cream, and added milk to make the soup less rich. You could probably substitute spinach for the arugula, or omit it completely. A bit of bacon would probably add some pleasant taste as well--although this soup had plenty of flavor on its own! Here is what I came up with:


Roasted Potato-Leek Soup

Ingredients
  • 2 pounds Yukon gold potatoes, peeled and cut into 3/4-inch chunks
  • 4 cups chopped leeks, white and light green parts, cleaned of all sand (4 leeks)
  • 1/4 cup good olive oil
  • Kosher salt and freshly ground black pepper
  • 3 cups baby arugula, lightly packed
  • 1/2 cup dry white wine, plus extra for serving
  • 4 to 5 cups chicken stock, preferably homemade
  • 1/2 cup heavy cream
  • 4 ounces creme fraiche
  • 1-2 cups milk (depending on desired thickness)
  • 1/4 cup freshly grated Parmesan, plus extra for garnish
  • Crispy Shallots, recipe follows, optional

Directions

Preheat the oven to 400 degrees F.

Combine the potatoes and leeks on a sheet pan in a single layer. Add the olive oil, 1 teaspoon salt, and 1/2 teaspoon pepper and toss to coat the vegetables evenly. Roast for 40 to 45 minutes, turning them with a spatula a few times during cooking, until very tender. Add the arugula and toss to combine. Roast for 4 to 5 more minutes, until the arugula is wilted.

In batches, transfer the roasted vegetables to a food processor fitted with the steel blade. Fill food processor half full of vegetables, and pour in enough chicken broth to slightly cover them. Puree thoroughly, adding more broth if necessary for mixing. Place puree in soup pot, and continue with the next batch.

When pan is cool enough to handle, pour in wine and a little chicken broth and scrape the bottom to loosen the fond. Add this mixture to the roasted vegetables as you are pureeing them.*

When you have pureed the soup base, place the pan over medium heat and add the chicken stock, creme fraiche, cream, and milk. Add the chicken stock and milk conservatively, until the soup is the desired thickness and taste. Season with salt and pepper.

When ready to serve, reheat the soup gently and whisk in 2 tablespoons white wine and 1/4 cup of Parmesan. Serve hot with an extra grating of Parmesan and crispy shallots, if using.

Makes 4 to 6 servings.


*note. Ina suggests using a metal rimmed sheet pan, and placing it over two burners for the deglazing process. I don't like the idea of staining the bottom of my baking sheets by placing them on my electric stove, so I use this method. You could add the wine right away if you are using a metal pan; I used a glass baking dish, so I had to wait until it cooled enough that it wouldn't crack from the cold wine.

Crispy Shallots

  • 1 1/2 cups olive oil or vegetable oil
  • 3 tablespoons unsalted butter
  • 5 to 6 shallots, peeled and sliced into thin rings

Heat the oil and butter in a saucepan over medium-low heat until it reaches 220 degrees F on a candy thermometer.

Reduce the heat to low, add the shallots, and cook for 30 to 40 minutes, until they are a rich golden brown. The temperature should stay below 260 degrees F. Stir the shallots occasionally to make sure they brown evenly. Remove them from the oil with a slotted spoon, drain well, and spread out to cool on paper towels. Once they have dried and crisped, they can be stored at room temperature, covered, for several days.

Yield: about 1/2 cup


Friday, January 22, 2010

Homemade pizza


3 reasons you should make pizza for dinner tonight:
1. You can clean out the fridge of all your leftover meats and veggies. Just sandwich it all between some tomato sauce and a lot of parmesan cheese, and nobody will know!
2. Your kids will love you.
3. You already agreed to a six-month gym membership anyway, right? Give yourself a reason to get down there!


First, mix up a little bread dough. If all that kneading sounds like too much work, enlist some child labor:


After the dough rises for an hour or so, roll it out into a crust. Sure, you could just buy a Boboli ready made crust. But then you couldn't do this:


Then, grab a jar of pizza sauce, or mix up your own with a little tomato sauce, tomato paste, and a few herbs.


Spread the pizza sauce on your crust, followed by the meat, veggies, and cheese of your choice.


Toss it into a 425 degree oven for about 12 minutes, and you've got a family favorite for a fraction of the cost!


Pizza Crust
1 pkg (2 1/4 tsp) active dry yeast
1 cup warm water or milk
1 teaspoon salt
2 teaspoons sugar
1 tablespoon olive oil
3 to 3 1/2 cups bread flour

1. Stir together the yeast, water or milk, salt, and sugar; let yeast proof for 5 minutes (should appear slightly bubbly - if not, the yeast may not work). Stir in most of the flour, work in additional flour as needed to form a smooth dough.
2. Cover and let rise in a warm place until doubled (turning on your oven for a brief minute then off again creates a nice warm environment).
3. Punch down and shape into one 15" crust or two 10" crusts. Top with your favorite toppings and bake pizza at 425 degrees for 10-12 minutes until golden brown and bubbly.


Pizza Sauce
6 oz. can tomato sauce
2 tablespoons tomato paste
1/2 teaspoon garlic powder
2 teaspoons dried basil
1/2 teaspoon dried oregano
2 teaspoons sugar (to cut acidity)
salt and pepper to taste

Heat ingredients together. Note: this sauce can be made ahead of time and stored in the refrigerator or freezer until ready to use.